1.开始
重要提示: Chrome 将在所有平台上移除对 Chrome 应用程序的支持。Chrome 浏览器和 Chrome 网上应用店将继续支持扩展。阅读公告并了解有关迁移应用程序的更多信息。
也就是说现在更加推崇插件,而不是chrome应用程序,让我们开始学习插件吧
介绍
扩展由不同但有凝聚力的组件组成。组件可以包括背景脚本、内容脚本、选项页面、UI 元素和各种逻辑文件。扩展组件是使用 Web 开发技术创建的:HTML、CSS 和 JavaScript。扩展的组件将取决于其功能,并且可能不需要每个选项。
创建一个新目录来保存扩展的文件夹。
创建一个名为manifest.json并包含以下代码的文件。
{
    // 插件名称
    "name": "Hello Extensions",
    // 插件的描述
    "description" : "Base Level Extension",
    // 插件的版本
    "version": "1.0",
    // 配置插件程序的版本号,主流版本是2,最新是3
    "manifest_version": 3
}在chrome的拓展页面打开开发者模式:chrome://extensions/
然后选择 “Load unpacked”(加载已解压的拓展程序),导入刚才我们新创建的文件夹,现在就可以看到我们的文件了!!
但是现在啥也没用。。此时我们可以添加后台脚本,让我们通过添加一些代码来存储背景颜色值。
注册脚本 + 添加存储权限
与许多其他重要组件一样,后台脚本必须在清单中注册。在清单中注册一个后台脚本会告诉扩展程序引用哪个文件,以及该文件应该如何运行。
大多数 API,包括存储API,必须"permissions"在清单中的字段下注册,以便扩展使用它们。
{
  "name": "Getting Started Example",
  "description": "Build an Extension!",
  "version": "1.0",
  "manifest_version": 3,
  "background": {
    "service_worker": "background.js"
  },
  "permissions": [
    "storage"
  ]
}
好了,现在我们有一个service_worker了,Chrome 将扫描指定文件以获取其他说明,例如它需要侦听的重要事件。
此时我们在根目录下新创建一个 background.js 文件,并且贴上代码
// background.js

let color = '#3aa757';

chrome.runtime.onInstalled.addListener(() => {
  chrome.storage.sync.set({ color });
  console.log('Default background color set to %cgreen', `color: ${color}`);
});此时我们在chrome拓展页面重新加载插件,然后还可以查看后台日志(查看console.log的信息)
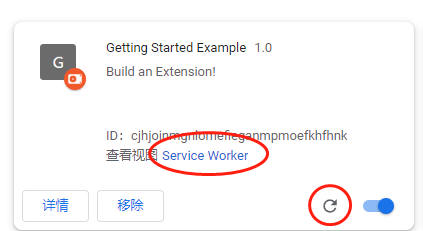
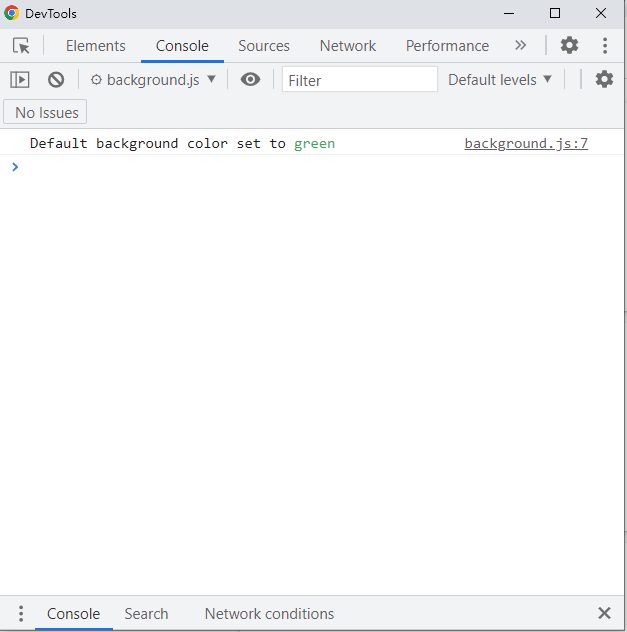
声明用户界面
类似于前端的html文件
首先在配置文件 manifest.json 中声明 action对象并设置popup.html为操作的default_popup.
{
  "name": "Getting Started Example",
  "description": "Build an Extension!",
  "version": "1.0",
  "manifest_version": 3,
  "background": {
    "service_worker": "background.js"
  },
  "permissions": ["storage"],
  "action": {
    "default_popup": "popup.html"
  }
}
然后再根目录下创建 popup.html 并且创建 button.css、popup.js在html中引入
<!DOCTYPE html>
<html>
  <head>
    <link rel="stylesheet" href="button.css">
  </head>
  <body>
    <button id="changeColor"></button>
    <script src="popup.js"></script>
  </body>
</html>
//popup.js
// Initialize button with user's preferred color
let changeColor = document.getElementById("changeColor");
chrome.storage.sync.get("color", ({ color }) => {
changeColor.style.backgroundColor = color;
});/*button.css*/
button {
height: 30px;
width: 30px;
outline: none;
margin: 10px;
border: none;
border-radius: 2px;
}
button.current {
box-shadow: 0 0 0 2px white,
0 0 0 4px black;
}重新加载插件
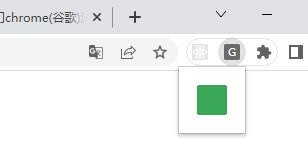
此时插件的弹窗就会显示html内容(我通过了js文件修改了button的颜色)
添加拓展程序的icon
工具栏图标的名称也包含action在该default_icon字段中。在此处下载 images 文件夹,解压缩,并将其放在扩展程序的目录中。更新清单,以便扩展知道如何使用图像。
{
  "name": "Getting Started Example",
  "description": "Build an Extension!",
  "version": "1.0",
  "manifest_version": 3,
  "background": {
    "service_worker": "background.js"
  },
  "permissions": ["storage"],
  "action": {
    "default_popup": "popup.html",
    "default_icon": {
      "16": "/images/get_started16.png",
      "32": "/images/get_started32.png",
      "48": "/images/get_started48.png",
      "128": "/images/get_started128.png"
    }
  }
}扩展程序还会在扩展程序管理页面、权限警告和网站图标上显示图像。这些图像在清单中指定icons。
(分别对应16位、32位、48位、128位的图)
{
  "name": "Getting Started Example",
  "description": "Build an Extension!",
  "version": "1.0",
  "manifest_version": 3,
  "background": {
    "service_worker": "background.js"
  },
  "permissions": ["storage"],
  "action": {
    "default_popup": "popup.html",
    "default_icon": {
      "16": "/images/get_started16.png",
      "32": "/images/get_started32.png",
      "48": "/images/get_started48.png",
      "128": "/images/get_started128.png"
    }
  },
  "icons": {
    "16": "/images/get_started16.png",
    "32": "/images/get_started32.png",
    "48": "/images/get_started48.png",
    "128": "/images/get_started128.png"
  }
}
重新加载插件
效果展示: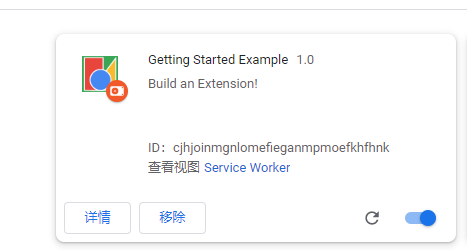
添加交互逻辑
将以下代码添加至 popup.js 中
// When the button is clicked, inject setPageBackgroundColor into current page
changeColor.addEventListener("click", async () => {
  let [tab] = await chrome.tabs.query({ active: true, currentWindow: true });

  chrome.scripting.executeScript({
    target: { tabId: tab.id },
    function: setPageBackgroundColor,
  });
});

// The body of this function will be executed as a content script inside the
// current page
function setPageBackgroundColor() {
  chrome.storage.sync.get("color", ({ color }) => {
    document.body.style.backgroundColor = color;
  });
}
在配置文件 manifest.json 中添加交互的权限
(清单将需要activeTab允许扩展临时访问当前页面的scripting权限,以及使用脚本 APIexecuteScript方法的权限。)
{
  "name": "Getting Started Example",
  ...
  "permissions": ["storage", "activeTab", "scripting"],
  ...
}
重新加载插件
点击绿色button控件就可以看到:
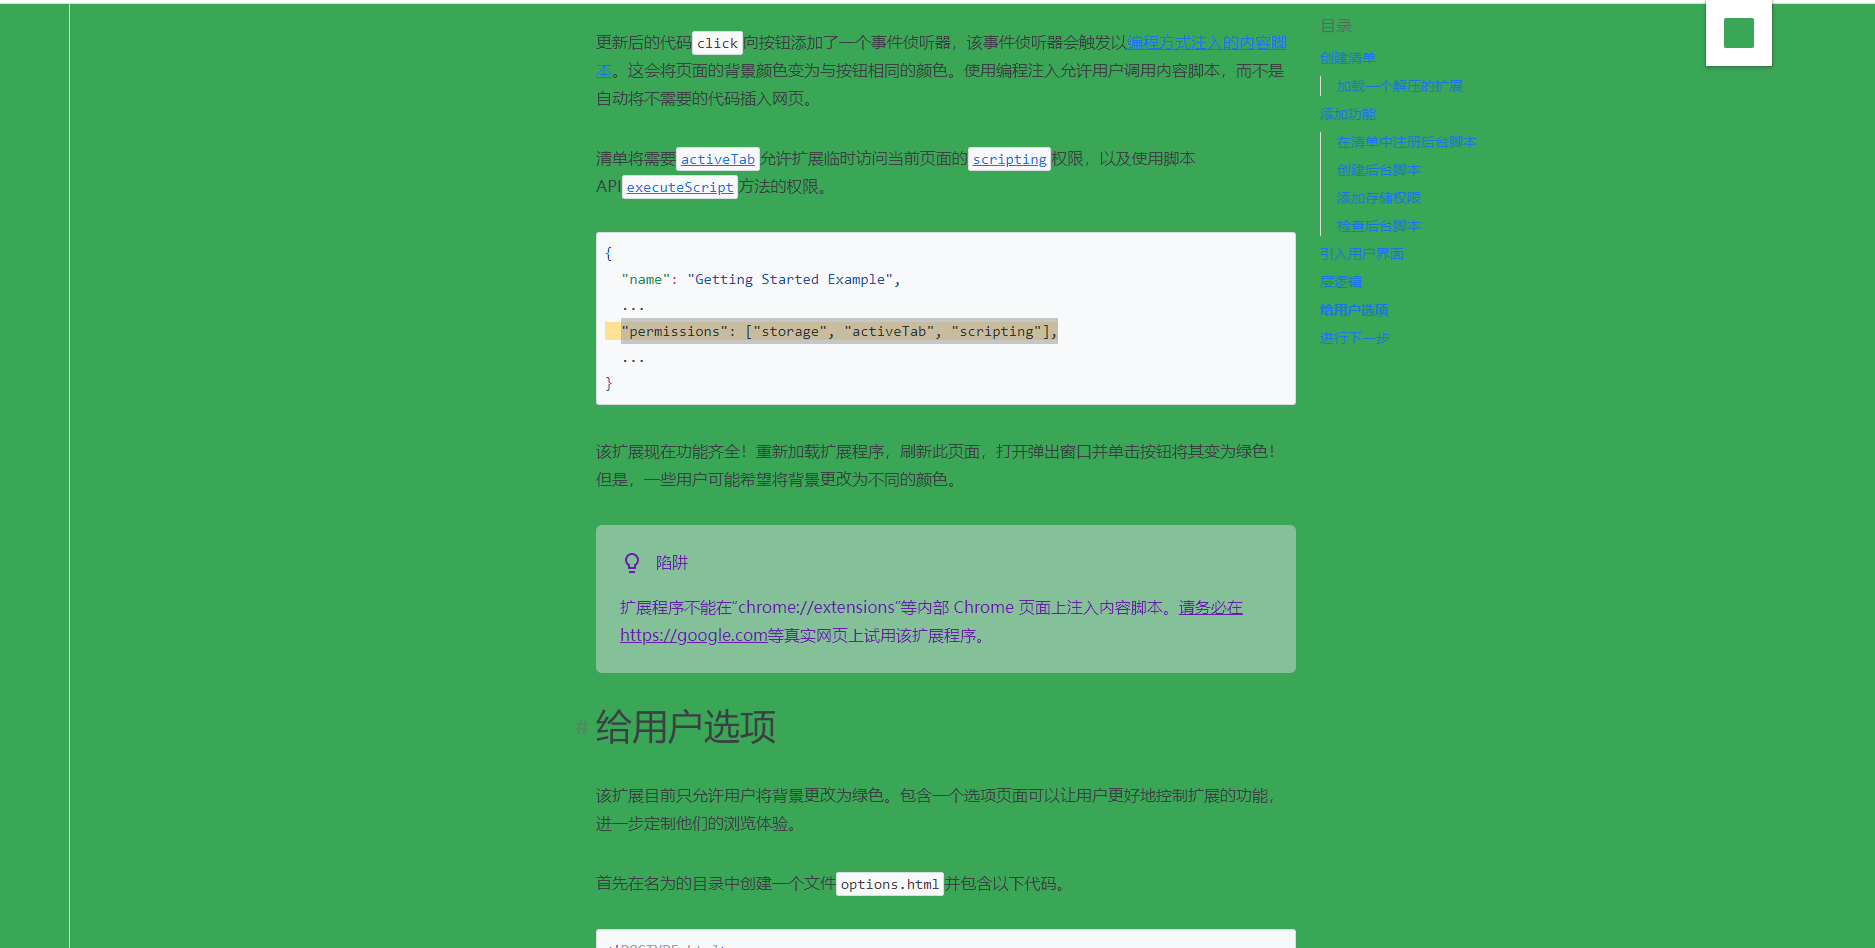
注意:扩展程序不能在“chrome://extensions”等内部 Chrome 页面上注入内容脚本。请务必在https://google.com等真实网页上试用该扩展程序。
以上小demo的拓展
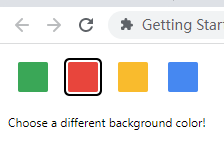
目前通过我们自制的chrome插件,只能把当前页面的改为绿色的,现在我们添加选项列表,让用户可以 将背景改为不同的颜色
给插件添加选项页面:
首先在配置文件 manifest.json 中添加
{
  "name": "Getting Started Example",
   //...
  "options_page": "options.html"
}
新建options.html 和 options.js
<!DOCTYPE html>
<html>

<head>
  <link rel="stylesheet" href="button.css">
</head>

<body>
  <div id="buttonDiv">
  </div>
  <div>
    <p>Choose a different background color!</p>
  </div>
  <script src="options.js"></script>
</body>

</html>
let page = document.getElementById("buttonDiv");
let selectedClassName = "current";
const presetButtonColors = ["#3aa757", "#e8453c", "#f9bb2d", "#4688f1"];
// Reacts to a button click by marking the selected button and saving
// the selection
function handleButtonClick(event) {
// Remove styling from the previously selected color
let current = event.target.parentElement.querySelector(
`.${selectedClassName}`
);
if (current && current !== event.target) {
current.classList.remove(selectedClassName);
}
// Mark the button as selected
let color = event.target.dataset.color;
event.target.classList.add(selectedClassName);
chrome.storage.sync.set({ color });
}
// Add a button to the page for each supplied color
function constructOptions(buttonColors) {
chrome.storage.sync.get("color", (data) => {
let currentColor = data.color;
// For each color we were provided…
for (let buttonColor of buttonColors) {
// …create a button with that color…
let button = document.createElement("button");
button.dataset.color = buttonColor;
button.style.backgroundColor = buttonColor;
// …mark the currently selected color…
if (buttonColor === currentColor) {
button.classList.add(selectedClassName);
}
// …and register a listener for when that button is clicked
button.addEventListener("click", handleButtonClick);
page.appendChild(button);
}
});
}
// Initialize the page by constructing the color options
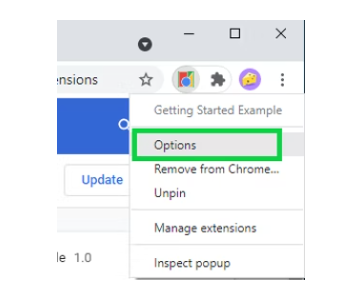
constructOptions(presetButtonColors);此时重新加载chrome插件,即可在插件位置的拓展选项中找到options,点击进入,然后进入选项页面
参考:https://developer.chrome.com/docs/extensions/mv3/getstarted/(chrome插件官方文档)
关于一些插件的开发细节,推荐一篇详细的文章:https://xieyufei.com/2021/11/09/Chrome-Plugin.html(可惜的是该文章讲的是v2版本的。。)
2.manifest.json
根据上文可以知道,manifest.json是用来配置我们的插件的配置文件,让我们来看一下一些配置详情
基础
除了上面提到的
{
    // 插件名称
    "name": "Hello Extensions",
    // 插件的描述
    "description" : "Base Level Extension",
    // 插件的版本
    "version": "1.0",
    // 配置插件程序的版本号
    "manifest_version": 3
}
使用 Manifest V3 的扩展有许多新特性和功能更改:
- 服务工作者替换背景页面。
- 现在使用新的declarativeNetRequest API处理网络请求修改。
- 不再允许远程托管代码;扩展只能执行包含在其包中的 JavaScript。
- 许多方法都添加了Promise支持,但仍支持回调作为替代方案。(我们最终将支持所有适当方法的承诺。)
- Manifest V3 中还引入了许多其他相对较小的功能更改。
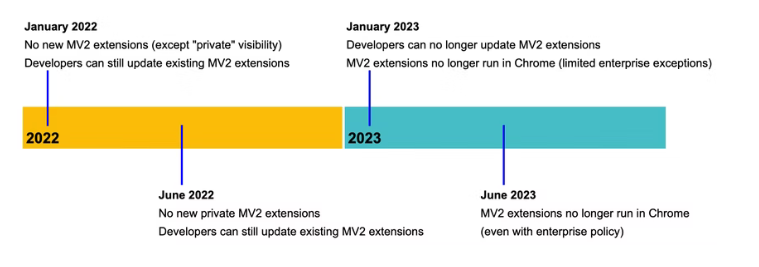
2023年1月份不再更新v2版本
弹窗
对于使用插件时,弹出的像小窗口页面,我们要设置 弹窗显示的页面和插件弹窗的icon
"action": {
    "default_popup": "popup.html",
    "default_icon": "popup.png"
}
后台
background(后台)属性,用于配置chrome插件的后台,它是一个常驻的页面,它的生命周期是插件中所有类型页面中最长的;它随着浏览器的打开而打开,随着浏览器的关闭而关闭,所以通常把需要一直运行的、启动就运行的、全局的代码放在background里面。
注意:Manifest V3 将后台页面替换为 Service Worker。
"background": {
    "service_worker": "background.js"
}
//background.js
chrome.runtime.onInstalled.addListener(() => {
console.log("插件已被安装")
});权限
{
  "name": "My extension",
  ...
  "permissions": [
    "storage"
  ],
  ...
}存储方法:chrome.storage可以移步到4章节观看
CSP配置
"content_security_policy": {
  "extension_pages": "...",
  "sandbox": "..."
}extension_pages此政策涵盖您的扩展程序中的页面,包括 html 文件和服务人员。
- 这些页面类型由
chrome-extension://协议提供。例如,您的扩展程序中的一个页面是chrome-extension://EXTENSION_ID/foo.html.
sandbox:此政策涵盖您的扩展程序使用的任何沙盒扩展程序页面。
3.网络请求
扩展可以修改网络请求的方式在 Manifest V3 中发生了变化。
Manifest V3 为 Promise 提供一流的支持:许多流行的 API 现在都支持 Promise,我们最终将在所有适当的方法上支持 Promise。
declarativeNetRequest概述
declarativeNetRequest API,它允许扩展以保护隐私和高性能的方式修改和阻止网络请求。这个API的本质是:
- 该扩展程序不是拦截请求并按程序修改它,而是要求 Chrome 代表它评估和修改请求。
- 该扩展声明了一组规则:匹配请求的模式和匹配时执行的操作。然后浏览器修改这些规则定义的网络请求。
使用这种声明性方法可以显着减少对持久主机权限的需求。
对于某些用例(例如重定向请求),某些扩展可能仍需要广泛的主机权限。有关更多详细信息,请参阅条件权限和 declarativeNetRequest。
与之前版本的 webRequestAPI (v3之前比如v2)
与webRequestAPI的比较
declarativeNetRequestAPI 允许在浏览器本身中评估网络请求。这使得它比webRequestAPI 更高效,在扩展过程中每个网络请求都在 JavaScript 中进行评估。- 因为请求不会被扩展进程截获,所以
declarativeNetRequest不需要扩展有后台页面;从而减少内存消耗。 - 与
webRequestAPI 不同,使用 declarativeNetRequest API 阻止或升级请求在与权限一起使用时不需要主机declarativeNetRequest权限。 declarativeNetRequestAPI 为用户提供了更好的隐私,因为扩展实际上无法读取代表用户发出的网络请求。- 与
webRequestAPI 不同,使用declarativeNetRequestAPI 阻止的任何图像或 iframe 都会在 DOM 中自动折叠。 - 在决定请求是被阻止还是重定向时,
declarativeNetRequestAPI 的优先级高于 webRequest API,因为它允许同步拦截。同样,通过declarativeNetRequestAPI 删除的任何标头对于 Web 请求扩展都是不可见的。 - 与
declarativeNetRequestAPI 相比,webRequestAPI 更灵活,因为它允许扩展程序以编程方式评估请求。
4.存储
chrome.storage
描述
使用
chrome.storageAPI 存储、检索和跟踪对用户数据的更改。权限
storage
概述
该 API 已经过优化以满足扩展的特定存储需求。它提供与localStorage API相同的存储功能,但主要区别如下:
- 用户数据可以与 Chrome 同步(使用
storage.sync)自动同步。 - 您的扩展程序的内容脚本可以直接访问用户数据,而无需后台页面。
- 即使使用拆分隐身行为,用户的扩展设置也可以保留。
- 它与批量读写操作是异步的,因此比阻塞和串行更快
localStorage API。 - 用户数据可以存储为对象(
localStorage API将数据存储在字符串中)。 - 可以读取管理员为扩展配置的企业策略(使用
storage.managed模式)。
使用
首先要在manifest.json 中声明权限
chrome.storage.sync.set({key: value}, function() {
  console.log('Value is set to ' + value);
});

chrome.storage.sync.get(['key'], function(result) {
  console.log('Value currently is ' + result.key);
});或storage.local:
chrome.storage.local.set({key: value}, function() {
  console.log('Value is set to ' + value);
});

chrome.storage.local.get(['key'], function(result) {
  console.log('Value currently is ' + result.key);
});使用时storage.sync,如果用户启用了同步,存储的数据将自动同步到用户登录的任何 Chrome 浏览器。
当 Chrome 离线时,Chrome 会在本地存储数据。下次浏览器在线时,Chrome 会同步数据。即使用户禁用同步,storage.sync仍然可以工作。在这种情况下,它的行为将与 相同storage.local。
警告
不应存储机密的用户信息!存储区域未加密。
存储限制
chrome.storage不是一辆大卡车。这是一系列的管子。如果你不明白,那些管子是可以装满的,如果你把你的信息填满了,它就会排成一行,任何人把大量的材料放进那个管子里都会延迟。
local:QUOTA_BYTES:5242880
sync:MAX_ITEMS:512;QUOTA_BYTES:102400
5.background -> Server worker
概述
Manifest V2 中的后台页面被 Manifest V3 中的服务工作人员取代:这是影响大多数扩展的基本更改。
Service Worker是基于事件的,并且与事件页面一样,它们不会在调用之间持续存在。此更改通常需要重新设计,需要考虑许多因素:有关更多详细信息,请参阅从后台页面迁移到服务工作者。
对比v2版本:
- 在 manifest.json 中替换
background.page或background.scripts替换为。background.service_worker请注意,该service_worker字段采用字符串,而不是字符串数组。 background.persistent从manifest.json中删除。- 更新后台脚本以适应服务工作者执行上下文。
配置:
{
  "background": {
    "service_worker": "background.js"
  },
}
定时器
setTimeoutWeb 开发人员使用orsetInterval方法执行延迟或定期操作是很常见的。但是,这些 API 在Server worker中可能会失败,因为调度程序将在服务工作人员终止时取消计时器。
// background.js

// This worked in Manifest V2.
const TIMEOUT = 3 * 60 * 1000; // 3 minutes in milliseconds
setTimeout(() => {
  chrome.action.setIcon({
    path: getRandomIconPath(),
  });
}, TIMEOUT);
相反,我们要用警报API
// background.js
chrome.alarms.create({ delayInMinutes: 3 });

chrome.alarms.onAlarm.addListener(() => {
  chrome.action.setIcon({
    path: getRandomIconPath(),
  });
});
6.执行代码
在v3之前(v2),我们可以执行外部代码或立即执行某预定义的代码:
chrome.scripting.executeScript({code: '...'})、eval()、new Function()
在v3之后我们不能再是使用了
在 Manifest V3 中,有几个方法从APIchrome.tabs转移。chrome.scripting
- 更改以下任何 Manifest V2 调用以使用正确的 Manifest V3 API:
| 清单 V2 | 清单 V3 |
|---|---|
tabs.executeScript() |
scripting.executeScript() |
tabs.insertCSS() |
scripting.insertCSS() |
tabs.removeCSS() |
scripting.removeCSS() |


